Today I was lucky enough to be featured in the SF Chronicle newspaper! Click A Nearly Lost Art if you'd like to view the article.
Wednesday, January 28, 2009
Monday, January 19, 2009
Draw Leaf Table

In this project the oak veneer on this table top had become so compromised that large areas were missing, and all of it was becoming unglued. Repairing the damage was not an option, it was necessary to remove the remaining veneer. New English oak veneer pieces were then cut and laid out to match the original pattern, before being re glued to  the substrate wood. Color matching the stain and finish to the original (base) was the final step. One resource for veneer sheets and strips that I use is Woodcraft at www.woodcraft.com
 the substrate wood. Color matching the stain and finish to the original (base) was the final step. One resource for veneer sheets and strips that I use is Woodcraft at www.woodcraft.com
Thursday, January 15, 2009
Mahogany Sideboard


This mahogany sideboard had numerous restoration challenges including; a badly cracked top, a broken leg, and incorrect style replacement door locks (with no keys). In addition there were areas of missing veneer and decorative inlay banding, as well as thick, poorly applied coats of varnish.
 First the (up to half inch wide) cracks on the top were glued together with hand shaped strips of solid wood. Then the top surface was scraped and sanded flat. During the finishing phase, these and some of the other repairs were touched up using earth toned pigments mixed with shellac.
Another part of this project involved replacing the modern cabinet door locks with traditional cabinet locks and keyhole escutcheons. In addition to the new locks being fit in the door backs, large areas of solid mahogany had to be inlaid over the over sized (previous) keyhole. Then new banding was inlaid, before cutting out the final key hole and insetting the escutcheon. The hardware in this project was purchased from Horton Brasses Inc., an excellent resource for antique style hardware.


After completion of all the repairs both structural and cosmetic, the finishing phase is the next step. In this project refinishing of some of the surfaces was needed, while other areas were cleaned and top coated. The end result is to blend together repairs and the overall natural color of the piece using a hand applied shellac finish.
Thursday, January 8, 2009
Carved door detail

This piece of mahogany detail from a victorian sideboard had carved losses. First a clean glue edge on the broken piece was prepared. Next a new piece of mahogany was glued on to the original in the shape of the missing area. Once the glue has set. the surface is carved to match the original, and stained to match. It was then sealed with shellac before refastening it to the door, and waxing. A good on line source for (hard to find) hardwood is http://www.gilmerwood.com/. They photograph and list individual pieces for purchase.
 was then sealed with shellac before refastening it to the door, and waxing. A good on line source for (hard to find) hardwood is http://www.gilmerwood.com/. They photograph and list individual pieces for purchase.
Wednesday, January 7, 2009
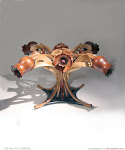
Walnut chair
 This hand carved walnut chair restoration included the structural repair of a broken back, and complete refinishing. First the teal green paint (not pictured) was removed by hand using a paste paint remover. The chair
  back was then disassembled, and doweled with hardwood before re-gluing. All surfaces were then sanded by hand and stained dark brown. A hand mixed shellac finish was then brushed on, followed by a steel wool rub out and waxing. I like to use Liberon 0000 steel wool available from any Liberon supplier.
Tuesday, January 6, 2009
Walnut Mirror

This mirror restoration project involved loose, cupped, and missing walnut elements. First loose edge moulding was removed, steamed to relax cupping, and re glued. New walnut material was then glued in to fill any remaining gaps, and shaped to match the profile of the surround ing mouldings. Then the wood repairs were sanded by hand and coated with shellac. After any necessary touch ups were done, the mirror was hand rubbed with an application of furniture paste wax. One of my favorite waxes is American Custom tinted wax available from Floyd Rosini at http://www.kingdomrestorations.com/.
 ing mouldings. Then the wood repairs were sanded by hand and coated with shellac. After any necessary touch ups were done, the mirror was hand rubbed with an application of furniture paste wax. One of my favorite waxes is American Custom tinted wax available from Floyd Rosini at http://www.kingdomrestorations.com/.
Subscribe to:
Posts (Atom)