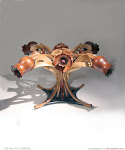
 This project involved attaching metal leaf to the visible surfaces of this walnut, hand carved console and mirror. This process is called gilding, or more specifically for this project oil gilding. The goal was to create a traditional looking gilt object that showed characteristic signs of aging and use. Treatment involved an initial cleaning and degreasing of all surfaces to be gilded. Scuff sanding of the surface was then performed to ensure proper adhesion of the subsequent surface materials. In order to mitigate the expensive cost of (gold leaf) material over such a large amount of surface, I developed a method to use a combination of 23.75 k gold and composition metal leaf, which I purchased from http://www.seppleaf.com/. The composition metal leaf was attached to the recessed areas using a fast drying oil size. These areas were initially sealed with a coat of shellac and later glazed to "age" or darken and diminish the subtle color differences between types of leaf.

The more prominant foreground areas were first coated with an oil-based, red primer coat, and smoothed before the gold leaf was attached with a slow drying oil size. Unlike composition leaf, which can be easily handled, gold leaf requires special tools to work with. Some of these include a gilders pad, knife, and soft, natural bristle "tamping" brushes to ensure the gold is carefully adhered to the surface. Because this process is time consuming (the console portion took 99 hrs!), and the size has a limited working time, dividing the piece into smaller areas of work was necessary. After all the surfaces were covered in leaf, an additional dark brown oil-based glaze was applied. Lastly, a coat of clear paste wax was applied using a range of buffing pressures to rub-off some gold leaf on prominant surfaces.
 This project involved attaching metal leaf to the visible surfaces of this walnut, hand carved console and mirror. This process is called gilding, or more specifically for this project oil gilding. The goal was to create a traditional looking gilt object that showed characteristic signs of aging and use. Treatment involved an initial cleaning and degreasing of all surfaces to be gilded. Scuff sanding of the surface was then performed to ensure proper adhesion of the subsequent surface materials. In order to mitigate the expensive cost of (gold leaf) material over such a large amount of surface, I developed a method to use a combination of 23.75 k gold and composition metal leaf, which I purchased from http://www.seppleaf.com/. The composition metal leaf was attached to the recessed areas using a fast drying oil size. These areas were initially sealed with a coat of shellac and later glazed to "age" or darken and diminish the subtle color differences between types of leaf.
  The more prominant foreground areas were first coated with an oil-based, red primer coat, and smoothed before the gold leaf was attached with a slow drying oil size. Unlike composition leaf, which can be easily handled, gold leaf requires special tools to work with. Some of these include a gilders pad, knife, and soft, natural bristle "tamping" brushes to ensure the gold is carefully adhered to the surface. Because this process is time consuming (the console portion took 99 hrs!), and the size has a limited working time, dividing the piece into smaller areas of work was necessary. After all the surfaces were covered in leaf, an additional dark brown oil-based glaze was applied. Lastly, a coat of clear paste wax was applied using a range of buffing pressures to rub-off some gold leaf on prominant surfaces.


